<body><script type="text/javascript"> function setAttributeOnload(object, attribute, val) { if(window.addEventListener) { window.addEventListener('load', function(){ object[attribute] = val; }, false); } else { window.attachEvent('onload', function(){ object[attribute] = val; }); } } </script> <div id="navbar-iframe-container"></div> <script type="text/javascript" src="https://apis.google.com/js/platform.js"></script> <script type="text/javascript"> gapi.load("gapi.iframes:gapi.iframes.style.bubble", function() { if (gapi.iframes && gapi.iframes.getContext) { gapi.iframes.getContext().openChild({ url: 'https://draft.blogger.com/navbar.g?targetBlogID\x3d37674881\x26blogName\x3dThe+Closet+of+Lulu+Persnickety\x26publishMode\x3dPUBLISH_MODE_BLOGSPOT\x26navbarType\x3dSILVER\x26layoutType\x3dCLASSIC\x26searchRoot\x3dhttps://closetoflulupersnickety.blogspot.com/search\x26blogLocale\x3den_US\x26v\x3d2\x26homepageUrl\x3dhttp://closetoflulupersnickety.blogspot.com/\x26vt\x3d-6391822709039125794', where: document.getElementById("navbar-iframe-container"), id: "navbar-iframe" }); } }); </script>

The Closet of Lulu Persnickety

A collection of oddities found in the closet of a most peculiar woman.
 

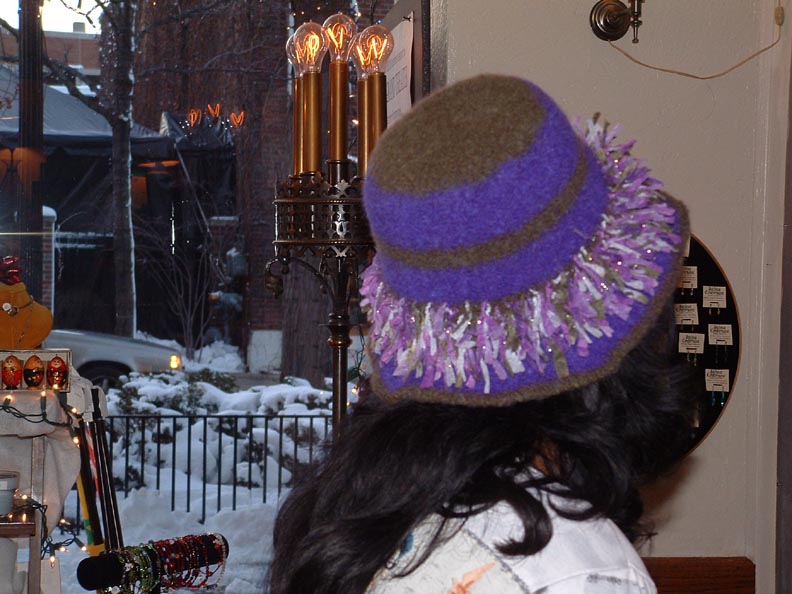
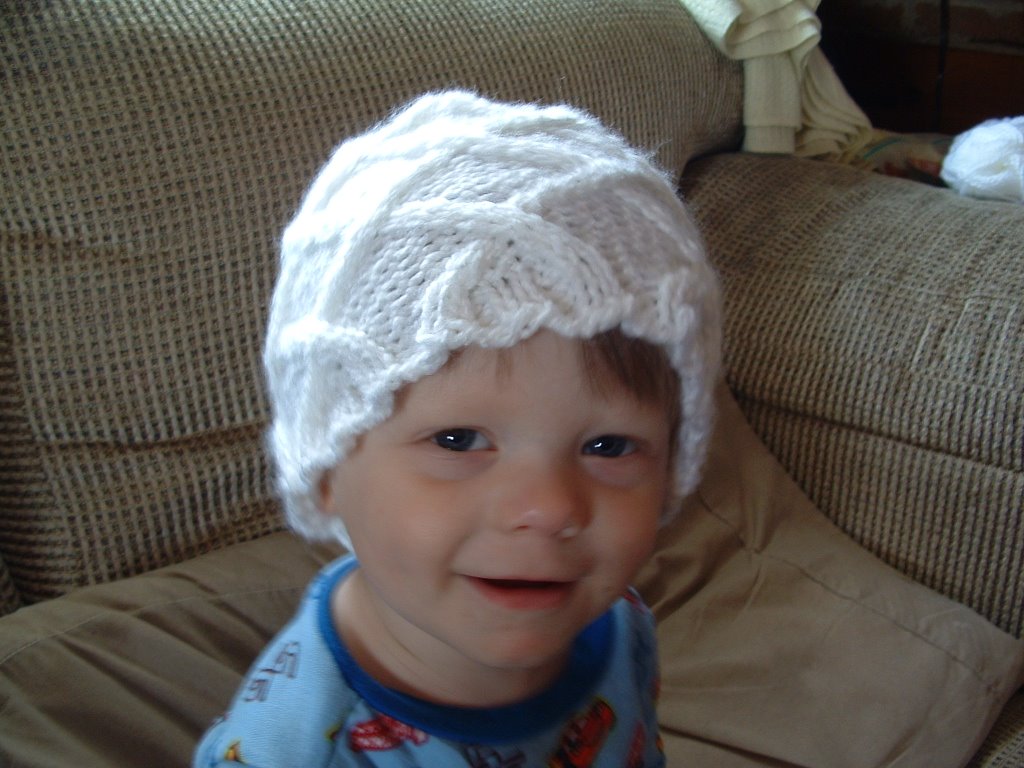
Pattern for Twisted Brains

Wednesday, December 27, 2006

Twisted Brains by Julie Kinsey


Supplies:
1- 16 " circular needles size 10
Set of 5 DPNs - Size 10
Cable needle
Yarn needle for finishing
1 ball bulky (5) weight yarn (Brand used in sample is Bernat's Softee Chunky)


Abbreviations:
K- knit
p- purl
s2K- slip two stitches knit wise
s2p- slip two stitches purl wise
K2tog- knit 2 sts together
p2tog- purl 2 sts together
2LT - (Left twist) Slip 2 sts to cable needle and hold in front, p2, then k2 from cable needle
2RT- (Right twist) Slip 2 sts to cable needle and hold in back,K2, then p2 from cable needle


This hat should fit an head sizes 19" - 22". It has a good deal of stretch to it. If you would like it to fit closer, then cast on with smaller needles for ribbing then switch to larger needles for the cable pattern.

Cast on 84 sts with US size 10, 16" circular needle. Join in round, being careful not to twist work. Place Contrasting marker to mark beginning of the round.
K2, p2 for 5 rounds.

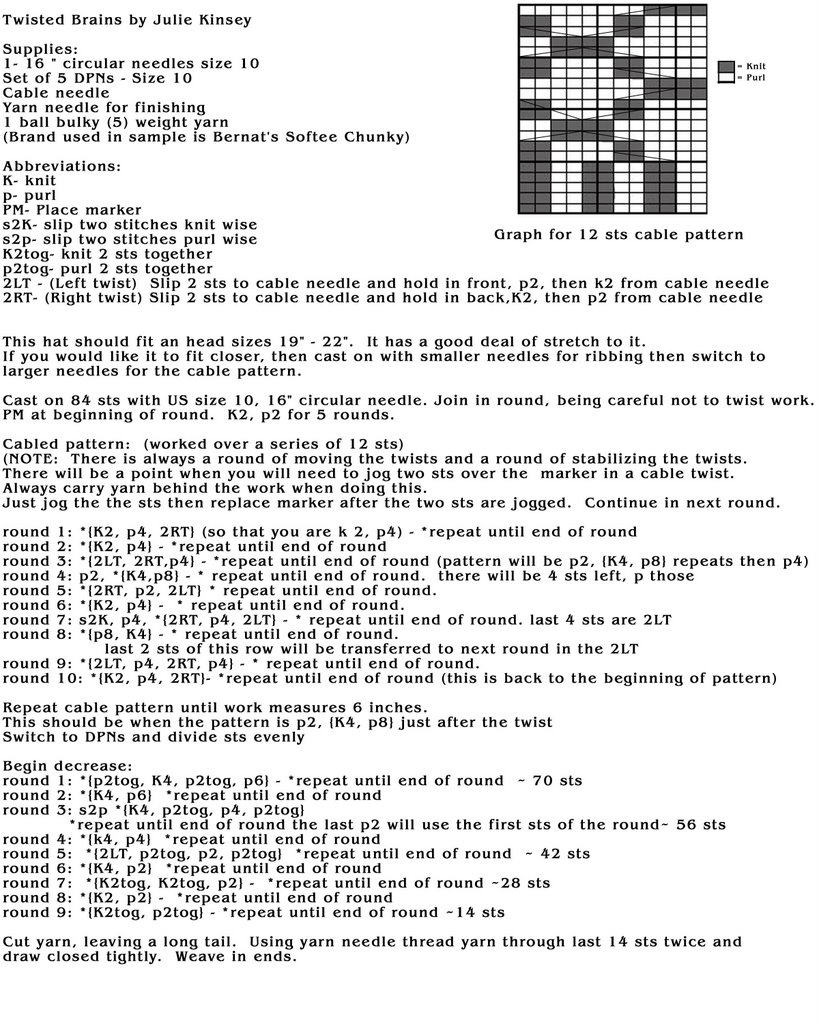
Cabled pattern: (worked over a series of 12 sts)
There is always a round of moving the twists and a round of stabilizing the twists.
There will be a point when you will need to jog two sts over the marker in a cable twist. Always carry yarn behind the work when doing this. just jog the the sts then replace marker after the two sts are jogged. Continue in next round.

round 1: *{K2, p4, 2RT} (so that you are k 2, p4) - *repeat until end of round
round 2: *{K2, p4} - *repeat until end of round
round 3: *{2LT, 2RT,p4} - *repeat until end of round (pattern will be p2, {K4, p8} repeats then p4)
round 4: p2, *{K4,p8} - * repeat until end of round. there will be 4 sts left, p those
round 5: *{2RT, p2, 2LT} * repeat until end of round.
round 6: *{K2, p4} - * repeat until end of round.
round 7: s2K, p4, *{2RT, p4, 2LT} - * repeat until end of round. last 4 sts are 2LT
round 8: *{p8, K4} - * repeat until end of round. last 2 sts of this row will be transferred to next round in the 2LT
round 9: *{2LT, p4, 2RT, p4} - * repeat until end of round.
round 10: *{K2, p4, 2RT}- *repeat until end of round (this is back to the beginning of pattern)

Repeat cable pattern until work measures 6 inches. This should be when the pattern is p2, {K4, p8} just after the twist
Switch to DPNs and divide sts evenly

Begin decrease:
round 1: *{p2tog, K4, p2tog, p6} - *repeat until end of round ~ 70 sts
round 2: *{K4, p6} *repeat until end of round
round 3: s2p *{K4, p2tog, p4, p2tog} *repeat until end of round the last p2 will use the first sts of the round~ 56 sts
round 4: *{k4, p4} *repeat until end of round
round 5: *{2LT, p2tog, p2, p2tog} *repeat until end of round ~ 42 sts
round 6: *{K4, p2} *repeat until end of round
round 7: *{K2tog, K2tog, p2} - *repeat until end of round ~28 sts
round 8: *{K2, p2} - *repeat until end of round
round 9: *{K2tog, p2tog} - *repeat until end of round ~14 sts

Cut yarn, leaving a long tail. Using yarn needle thread yarn through last 14 sts twice and draw closed tightly. Weave in ends.

Here's the pattern as a jpeg file with cable graph:


Any questions or comments can be sent to: goostyx@yahoo.com

Labels: , ,

The Skull Illusion Scarf

Tuesday, December 26, 2006


Well, even though I made this one a bit on the shorter side, it came out awesome. Brian's eyes lit up the second I revealed the secret of the scarf.


I found this pattern at Ysolda's blog


More pics are on their way.

A Blast From the Past

Wednesday, December 20, 2006


Here's one of my early hats. I made it especially for my sister-in-law. She decided to sport a mohawk and once winter came she realized she needed a good hat. So I made this one up and it is lovingly reffered to as the "Fry Guy" hat. It looks too much like one of the fry guys from McDonald's. It is a felted hat with Squiggle yarn added into the mix. I'm glad I finally got a picture of this hat!

Happiness is a Warm Pair of Hands


Well, I've finally had some time to make myself something.


I was searching all around for good fingerless mitt patterns and of course, due to my high standards, I couldn't really find a good pattern.


So I made one up with a bit of influence from a pattern I found at Lion Brand Yarn's website. Their pattern for Cashmere Arm cosies was my inspiration.


However, with that pattern, it is worked flat, whereas I worked in the round. I shortened them up and only added the cabled "Happiness" symbol onto the back of the hands. The palm is worked in a rib pattern.


I'll post the pattern as soon as I write it up. The "Happiness" symbol came from Elsebeth Lavold's book VIKING PATTERNS FOR KNITTING. I love her book. Most of my self-made projects will have something from her book incorporated into it. If you use a solid color yarn, the cabled pattern will show up better. I was really itching to use this yarn, which I lovingly refer to as Urban Camo.

Coming Soon!

Thursday, December 07, 2006

I have spent the last two months knitting my hands off. I've been making Christmas presents for my family. Today is the day I can say that I am done with fabrication! YAY! So await the photos of my scarves, hats, and, most interesting, Illusion knitting.
Now I can begin knitting some things for myself. Of course the list is long of things for me to make for myself but the most important is a pair of socks. I have been practicing, and now feel confident to make my own pair thanks to Socks 101. Surprisingly, it wasn't that difficult to make socks. I had always been intimidated by the phrase "turning the heel." Not any more, I'm over it.

All the Lords and Ladies

Monday, December 04, 2006


These are pictures from my wedding. What a jolly bunch! The main reason I have these up is not just because we all look awsome, but because I made some of these costumes. Of the men, I made the blue captain's coat and pants, and in the back row I made the brown peasant outfit. Of the women, I made the chemise of the sitting left woman, dyed the purple skirt of the woman sitting on the right, and behind her the complete blue ensemble. The top left, was made by the woman wearing it. It was an overall wonderful experience making the costumes. There were several other costumes made. For my father I made a captain's coat. For the minister, I made a bodice and chemise, and we made a lot of the decorations too! Some of the women helped me make pennant banners. I'll look for some of those pics and post later. The bride and groom costumes were made by Moresca. A wonderful company that tours the renaissance faires. They make beautiful garments and accessories, very well worth their weight in gold.

Felted Hats

Sunday, December 03, 2006


Here is one of the many knitted felted hats I have made. This cloche hat is made from Paton's yarn and some frizzy stuffs that I forgot the name of. It is awaiting a loving owner to adopt it at my friend Melissa's store, Stone Embrace Gifts in Wheaton, IL.


I have made several other hats for Stone Embrace Gifts as well. Here is my wall of fame pictured in the store. There are a few more cloche hats as well as one lone paige boy hat. I really thought the paige boy hat was going to be a difficult pattern but I found it to be very easy going. It is a VERY bulky and heavy hat. I think it would be a great hat for some one with dreadies or very thick hair.


© 2006 The Closet of Lulu Persnickety | Blogger Templates by Gecko & Fly.
No part of the content or the blog may be reproduced without prior written permission.
Learn how to Make Money Online at GeckoandFly


Counter
Walmart Online Shopping